Monday, October 15, 2012

French Apple Pie Cake


I’m a pretty sentimental little bastard, and food ties in nicely with my Sheldon-Cooper-esque, nostalgia-driven obsession with days of yore.

Years ago my parents had one of those old-school dishwashers that you had to roll across the kitchen, and attach it to the kitchen sink in order to kick off the wash cycle.  Later on when they replaced the Mesozoic appliance, my Dad harvested the wooden top, and re-purposed it into a ginormous cutting board, and gave it to me.  It remains one of my most prized possessions, despite the fact that it’s an absolute bitch to clean, as it doesn’t even come close to fitting into the sink.  It has also served well as an ersatz baby gate when friends with kids have visited. 

Despite the fact that it’s so gargantuan, and could likely serve as the barrier door on a nuclear bunker, I’m highly protective of it, and God help anyone who thinks they can use it without my express permission/supervision.

While I’m talking about sentiment (and neurosis), I also have a mug from my late grandparents.  Technically it’s a coffee mug, but since my grandparents were very English, and rather proper, we only ever had tea in their company.  As such, the mug may only contain tea.  In the years since, I’ve managed to find more pieces in the same pattern, and I will allow other beverages to be served in the mugs.  EXCEPT the one from my grandparents.  Yes, I’ve memorized the position of the manufacturers mark on the bottom of the mug, and know which one is sanctified.

So yes, I’m a bit psycho.

However, in amongst the random synaptic firings in my brain I did manage to get one oddity which has proved quite useful: a pretty damned fine memory, if I do say so myself.  And it is that oddly-honed attribute which is responsible for this recipe seeing the light of day.

I remembered this cake showing up in my school lunches a couple times back in elementary school (we’re talking mid 80’s here, people).  At the time it wasn’t so much the cake itself I was in love with, but the caramelized coconut topping.

I called my Mom to ask for the recipe,

“Do you still have the recipe for French Apple Cake?”

“The what?”

“You must remember.  The one with the coconut on top…?”

We went back and forth for a while, and over the course of several phone calls.  My vague descriptions of the recipe card in her handwriting, clearly saying “French Apple…”.  Her phone calls back with random recipes for carrot cake, coffee cake, and then eventually we both gave up, even though it was driving us both crazy by this time.

Ten minutes after we’d hung up, my phone rang again, and I answered, hearing two words that made these wistful little toes wiggle “Got it!”.

Apparently I inherited my obsessive nature from my Mom, as she pretty much conducted an archaeological dig on her vaults of recipes until she found this misplaced (but not forgotten) gem.

French Apple Pie Cake

For the cake:

·      4 cups chopped apples
·      2 cups brown sugar
·      1 cup oil
·      2 eggs (beaten)
·      2 tsp vanilla
·      1 cup chopped walnuts (optional)
·      2 cups flour
·      2 tsp baking soda
·      1 tsp salt
·      2 tsp cinnamon

For the topping:

·      ½ cup melted butter
·      2/3 cup brown sugar
·      ¼ cup cream or milk
·      ½ cup shredded coconut

Preheat oven to 350°.  Grease & flour a 9x13 pan.

In a large bowl mix the brown sugar with the chopped apple.  Add oil, eggs and vanilla, and stir/fold mixture until evenly dispersed.

In a separate bowl sift together flour, soda, salt and cinnamon.

Add to apple mixture, folding immediately until blended.  The batter will be sticky and somewhat stiff.

Pour batter into prepared pan, using a spatula to push batter to edges and corners, and bake for 40-60 minutes.  Test with a toothpick for doneness.  No batter on the toothpick?  It’s done.

Meanwhile, mix topping ingredients. 

When the cake comes out of the oven, switch on the broiler (leaving rack in the middle of the oven).

Spread topping ingredients on the warm cake, and place under the broiler.  When mixture is bubbling and bronzed, remove and allow to cool before cutting and serving.


It turns out my memory did fail me somewhat on this one.  The actual cake is delightful!  Carrot-cakey in texture and moistness.  Capped off with the coconut, DAMN!  Fine little piece of baking it be!

Wednesday, September 26, 2012

A Love Letter to Enid


It’s been a while since my last post, but I have a perfectly good explanation: my dog ate my homework.

You know how some people just inspire the crap out of you?  My high school art teacher was/is one of those people.

In a school where boys were expected to be jocks, or permanent residents of the metalwork room, her classroom was a safe haven for the creative Goth nerd that I happily was (still am, really.  It’s just my hair that’s less absurd).

She’s one of those “cool” teachers who never tried to be our best friend by dumbing herself down.  There was never any question who was in charge in that classroom (even my attempts to hi-jack the stereo are proof of that).  There was never any “oh Captain, my Captain” grand-standing, or such twee attempts at getting on anyone’s good side.

We learned. 

We grew.

We were inspired.

And we did all of those things because Enid somehow held that space for us.  In the course of a few one hour sessions a week she heard our adolescent gripes, perceived persecutions, and (completely self-indulgent) woes.  All the while helping us to hone our skills, find our voices, merge the two, and get it down on canvas.

After these many moons we’ve thankfully reconnected through the many-tentacled Cthulu of social media.  The only difference in my esteem of her now is that I see she’s incredible in her home life too!  Stunning photography, mouth watering recipes, a wicked sense of humour, and a geek-tastic appreciation of all things pun-related (a woman after my own heart).

So it’s in the spirit of a sheepish student walking in with his belated assignment that this post comes to you.

Shared with me as a birthday prezzie (from my beloved Enid), I give you:

Enid's Even Better Plum BBQ sauce

16 c plums, halved & pits removed
8 c apples, cores removed, and cut into chunks
1/2 c apple cider vinegar
4 cups homemade blackberry juice,
1 head fresh garlic, peeled
2 Tbsp tamarind
1 Tbsp kosher salt
1 tsp mustard
1 1/2 Tbsp fresh chopped ginger
1 large white onion, peeled and cut into chunks,
1/2 med red onion, cut into chunks
1 habanero pepper with seed, stem removed if necessary
1 c molasses
3 cans tomato paste

Put all ingredients in a large stockpot.  Bring to a simmer, and allow to cook slowly for 5 hrs or so, stirring often.  Blitz smooth in blender, simmer some more, can in boiling water for 10 min.


A few words about this (yes, I’m still arguing with teachers): this recipe is not set in stone.  For example, the first batch I made fell short on a few ingredients. I didn’t have blackberry juice or tamarind at my disposal.  I did, however, have a bag of frozen mixed berries in the freezer (blue, black & raspberries), which could be quickly thawed, and the juice pressed out of them. 

I also added a couple pinches of cumin seeds, used only white onions, and instead of habanero pepper I threw in a few dried guajillo peppers.

You can also adjust the sweetness after you’ve blended your sauce.  Honey, maple syrup, brown sugar, agave nectar etc, are all great options.  At this point you can also add other things like cayenne for extra spiciness, a bit of ground cumin, or even some smoked paprika if you believe unsmoky BBQ sauce is nothing less than heresy.

As for advice on the canning side of things, well, once more I direct you to YouTube or bernardin.ca.  This was my first attempt at canning, and as I type this the lids are still popping away in the kitchen, so who’s to say I know what I’m talking about. 

So, I dedicate this post not only to Enid, but to all teachers, and friends who are teachers, and those who once were teachers, and friends who have been inspired by teachers.  They not only take responsibility for our education (often going WAY beyond "two plus two equals..."), but it turns out they have some damned fine recipes in their repertoire, too.


Tuesday, July 3, 2012

Eggplant Fritters


Yes, I’m quite aware of how neglectful I’ve been of posting here.  You know that feeling when you’re so far beyond the point of procrastination/missed deadline that the thought of even bothering to attack the task just seems silly and pointless?  Well, I passed that point about a month ago, rapidly followed by alternating patterns of guilt, shame, anger, and apathy.  At the moment I'm having a rare lucid moment of "yeah, why not?".

Also, even though our weather here has been a deep, dark shade of crappy, there’s still been enough activity in the yard to keep me busy.  I’ve managed to have a bit of a food crop going in a small plot out back (peas, kale, arugula, lettuce, cauliflower, turnips…), as well as a greenhouse with a variety of tomato plants which are showing signs of promise.  Unlike last year where the tomatoes I’d planted in the yard got about a foot high, then rotted and turned to slime.  And yet people say climate change isn’t real.  Sigh.  I seem to recall summers where one would actually have to turn on the sprinklers once in a while.

Anyways, in the time since last I rambled there’ve been a few things which have come out of the kitchen which may be noteworthy.  This post is about one of the standout items, which will be making another appearance on tonight’s menu.

I love me my eggplant.  Whether smooshed into a babaganoushey dip, basted in oil and roasted, swimming in hoisin in a Chinese hotpot, sliced and roasted in a moussaka, etc.  It’s true it doesn’t have much flavour of it’s own, but what it lacks in flavour of it’s own is more than made up for by it’s ability to absorb the flavours of around it.

Eggplant fritters (makes about 12)

·      2 eggplant, peeled and sliced into ¾ inch (2cm) slices
·      salt
·      olive oil (for basting)
·      1 egg
·      ½ cup grated parmesan cheese
·      good handful chopped fresh parsley
·      1 tsp thyme (generally I’d use fresh, but since I busted the cat pissing on the plant, dried thyme is just fine)
·      Salt & Pepper to taste
·      handful breadcrumbs (about ¼ cup)
·      1-2 Tbsp flour
·      oil for frying
·      mozzarella, cut into ½ inch chunks, one for each fritter

Sprinkle sliced eggplant with salt, and let stand (I usually arrange them on cooling racks).  When moisture has been drawn out, blot dry, and preheat oven to 350°.  Arrange on baking sheets, basting both sides with olive oil, and place in oven for 45-50 minutes (flipping the eggplant at about the 25 minute mark).

Eggplant should be somewhat collapsed, and dry when done.

Remove to racks until cool enough to handle.

Give them a rough chop, and toss into a bowl, adding egg, cheese, seasonings, breadcrumbs and flour.  Mash thoroughly with your hands until evenly mixed.


Heat oil over med-high heat in a deep-sided pot (or if you have a deep fryer, just use that, I guess). 

Take slightly more than a tablespoon of the eggplant mix in your hand, and flatten. Slightly.  Place a cube of mozza in the center, and form the eggplant around it, adding more of the eggplant mix if needed.  Continue until you’ve used up all the mix.

When a wooden chopstick pressed to the bottom causes a steady thread of bubbles to rise, the oil is ready.

Drop into the oil in small batches, never over-crowding the pot.  Turn frequently with a slotted spoon or tongs to ensure even browning.  After about 4 minutes, when deeply bronzed, remove from oil, and drain on paper towels.

Serve immediately, or place in a warm oven, and continue frying the rest.

When ready to serve, serve alongside a good tzatziki , or even just lemon wedges to spritz over top.


Thursday, May 10, 2012

Coconut Candy


Ah, food trends!  Remember the obsessions with wheat germ, oat bran, and flax?  The recent “discovery” of quinoa?  Butter is bad, butter is good, butter is bad, butter is “THE BEST THING FOR YOU EVER!  EATITEATITEATIT AHHHHHHHGGGHHHH!!!”  Yes, these health trends come and go, and I’m not about to dismiss any of the claims for or against any of the above. 

One mantra has remained constant in the bi-polar argument: “All things in moderation”

Well, it seems the trendy eyes have set their sights on coconut these days (wasn’t it bad for us a short while ago?).  Coconut milk, coconut water, coconut oil, coconut this-and-that.  This is one fad I can willingly jump into.  I love coconut!  I’ve often wondered how difficult it would be to have Thai green curry on an IV drip.  Oh, and recently, I had a ceviche with coconut, cilantro and lime.  Blissful.

I recently bought a whole coconut.  Initially under the premise of attempting to make my own coconut milk for a curry, but, well, you guys know me… I got distracted.

Instead, as I was standing at the kitchen counter with a coconut in one hand, a cleaver in the other, and a playlist of YouTube tutorials on how to open said nut in front of me, I got remembering the coconut candy of Hawaii.  Most commonly seen at roadside stands, made by a Mom-and-Pop operation, alongside fresh and dried fruits, and signs advertising the ubiquitous “shave ice”.  I figured I would abandon the now seemingly lack-luster project of making coconut milk, and embrace sugary, tropical goodness.

I looked at a couple different ways to go about doing it, and I ended up launching into one method (slow simmering in a sugar syrup), only to find that that just wasn’t working.  I changed gears and went for the slow-roasted version, which ends up melting the sugar over the coconut as it cooks.  As such my recipe reflects a combination of the two methods.

Ingredients:

A coconut
About ¾ cup water
A shiteload of sugar (turbinado or demerara), roughly 1 ½ cups

I’m not going to regale you with some sort of instructional toolkit of how to open a coconut.  Go to YouTube.  If you have better luck than I, consider yourself amazing.  I was not amazing.  Instead I ended up with about nine random chunks of coconut, and a bowl of coconut water with a small sasquatch worth of fiber floating in it.


However, once you do have the coconut opened, and the meat separated from the husk, cut the meat into small chunks about the size of large chocolate chips.  You could also slice the meat into strips with a vegetable peeler.

Combine the coconut, water and 1 cup of sugar in a saucepan and bring to a gentle boil.  Maintain boil for about half an hour.


Preheat oven to 250°.

When liquid in the pot has reduced somewhat (yes, “somewhat” is an exact measurement), strain the coconut from the liquid, reserving the liquid, and spread the coconut on a baking sheet.

Sprinkle with sugar, and spoon about 1-2 tablespoons of the reserved liquid over the coconut.

Here’s the fun part: Place in the oven for 8-10 hours.  Did I not mention you have to decide not to have a life outside the home the day you make this?

Every 45 minutes or so, spoon on an additional few spoonfuls of the liquid, and turn the coconut pieces.

Now, I admit I did allow myself to have a life.  To do so, I just turned off the oven, and left the sheet hanging out in the oven until I returned and turned it back on again.

Not entirely low-maintenance, but not entirely time consuming, really.  Kind of like bread making: you just need to be there for it when it needs you.


The result?  Gorgeously bronzed nubbins of coconutty happiness.  Perfect for grazing on when the need for a sugar fix strikes, or even if you just need to psyche your body into thinking you’re somewhere tropical.   I’m thinking I may even be able to use them in place of chocolate chips in cookies.  Ah well, after the 8 hour marathon, maybe I’ll give the oven a break for a while.

Saturday, April 14, 2012

There's no place like home

Vacation.  Aaaaaahhhhh, how I love thee!  There's so much to be said for a recharge, and for me a big part of that is not necessarily having to cook.

We just returned from Maui with a dear friend.  We are tanned, we have replaced our bloodstream with macadamia nuts, and we are also glad to back home around the familiar things:  The comfort foods, the feline entourage, the bathtub which doesn't require extensive Ashtanga yoga to submerse oneself.

Some of you may recall my post a while back about banana bread.  Well, dear readers, the banana bread in question in said post has been achieved and it is almost as lovely as the woman who makes and sells it.  We finally braved the scary-as-all-hell road, and pulled into the village of Kahakuloa where Julia's roadside stand beckons like a lime-green lighthouse in an ocean of vehicular peril.

Five minutes in Julia's company makes you forget that your nerves have been shot for the past half an hour.  The samples of banana bread, taro chips, coconut candy, and various dried fruit are a welcome jolt to ones wavering blood-sugar levels.  She is loveliness incarnate, and her calm, friendly demeanor makes you understand what REAL "aloha spirit" is all about.

Needless to say we bought banana bread, and yes, it is AMAZING!  I still hesitate to call it the best ever, because, let's face it, the fact that you put your life on the line to get does give it a wee bit of an advantage in the polls.

That being said: if you do go, and don't bring some back for me, you'll have an entirely new peril to contend with.

Sunday, April 1, 2012

Another for the "WIN!" category


First of all, there are no photos of this delightful little dish.  That’s because the meal just sort of evolved, and “happened”, and by the time it was done I suspected it might not be worthy of a photo op let alone a blog post anyways. 

I was wrong.  It was amazing.

I had started out making a basic salad for dinner, and decided some prawns might be a handsome protein accompaniment.  Well, you know how things go: you start prepping a marinade, you get inspired, you find yourself chopping aromatics, and mixing spices, then suddenly realize that although you have a billion salad toppings, you actually only have about 3 leaves of wilted baby romaine gasping away in the fridge.

Plan B, wherefore art thou?!

So here’s what ended up being on hand, and got conscripted to the understudy role of “Dinner”:

Prawn Soba

Prawns:
·      1 Tbsp finely chopped cilantro
·      1 clove garlic, mashed fine
·      1 tsp lime juice
·      1-2 Tbsp olive oil (I had a fun garlic-infused one on hand)
·      pinch salt
·      few grinds pepper
·      slight drizzle sesame oil
·      About a dozen prawns, peeled (thawed if frozen)
·      ½ red pepper, sliced thin

Noodles:
·      Soba noodles (about half a package of dry noodles)
·      ½ c chopped frozen spinach
·      ½ c chopped cilantro

Dressing:
·      3 Tbsp soy sauce
·      2 Tbsp rice vinegar
·      2 Tbsp maple syrup (or sugar, but hey, you don’t have to dissolve the maple syrup)
·      scant 1/4 tsp sesame oil
·      2 green onions, sliced thin

*Optional, but highly recommended: Japanese chili spice (Nanami Togarashi)


Mix the first 7 ingredients of the prawn marinade together before adding in the prawns and tossing to coat.  Add a bit more oil if needed.

Put water in a medium pot to boil.  While waiting for water to come to a boil, prepare the dressing.  Adjust sweet (syrup), salty (soy), sour (vinegar or lime juice) to taste, and set aside.

When water is boiling, add the soba, and cook according to package directions.   About a minute before end of recommended cooking time for the noodles, add the chopped spinach.  When noodles are tender, drain in sink, running cold water over them to stop cooking.  Drain thoroughly.  Place in a large bowl, sprinkle the cilantro and drizzle the dressing and toss to mix.

Heat a skillet or wok over med-high heat.  When water hisses in the pan, add about a tsp olive oil, and toss in the red pepper.  Stir to coat with oil, then add the prawns, scraping as much of the marinade into the skillet as you can muster. 

Cook, stirring frequently until prawns are pink, and cooked through (3-4 minutes).

Immediately pour prawn mixture over cold noodles, and toss thoroughly, adding Japanese chili powder to taste if you want a bit of kick.

This is another one of those dishes which hit that “happy place” in my brain.  Perhaps there’s some sort of mood-elevating alchemy in the sweet/sour/salty/spicy premise which finds its way into so many Asian cuisines.  I seem to go back to the four “S”s by accident, often, willingly, and happily.  I’m not gonna overthink it.  It’s cheaper than therapy.

Wednesday, March 21, 2012

Done with Winter? Hell yeah!


Spring Niçoise Salad

Well, since spring has “officially” arrived, I’m gonna pretend that the worst of winter is behind us, and delve headfirst towards more “Springy” things.  Namely this salad featured on finecooking.com

I’m not going to lie and say this is the kind of salad you just slap together.  You pre-cook artichokes, beets, and potatoes separate from each other, boil up some eggs, sear some tuna, and finally lay it out on a bed of greens.  The recipe indicates arugula, but I went with a spring mix, as I like the “bite” in this salad to be from the vinaigrette.  That being said, I did get a bunch of watercress, and added a handful of the leaves to my greens.  Peppery!  Fresh!  Fun!

I also tweaked the vinaigrette a bit (completely, really).  I used the leftover juices from roasting the beets, as well as the herbed oil from the roasted potatoes.  Of course, in using the beet juices it does make your salad resemble a massacre a la ‘Nightmare on Elm Street’, but it is more than a bit refreshing to see a clash of colours on the plate before me.

Yes, it would’ve been just as easy to just set my sights on cooking a full meal rather than putting all my time, energy and efforts into salad toppings, but honestly, I think the lengthening days deserve a bit of an homage.  Time to start retiring the squashes, soups, and carb-heavy meals, and move boldly towards summer.  Is that a patio with a gin and tonic calling me…?

Monday, February 27, 2012

Go, Rama, Go!


I’m gonna blame the weather. 

For reasons I can’t understand, let alone articulate, getting this post together has been a helluva challenge.  I’ve been exposed to every little facet of my diminished attention span. 

It’s gotten ridiculous. 

It seems the window of time I can commit to the simplest task these days has gotten so small that if it could drive, it would buy a red sports car, with a bass-heavy stereo to compensate for its shortcomings.

Yes.  My attention span has erectile dysfunction.

So, as I said, I’m blaming the weather.  As such it’s appropriate that this is the dish I wanted to share.  When we were living in Montreal a few years back we had gone out for Thai food one evening.  It was about -15 degrees Celsius, a cold wind ripping snow from the banks along rue St. Denis, and throwing it mockingly in our faces as we trudged towards the restaurant.  We almost turned back at a certain point, as we knew we still had a hefty walk ahead of us.  But we persevered for some reason (I had probably refused to cook), and eventually found ourselves at the restaurant.

Once inside, we had an incredible meal.  I don’t even recall exactly what we had (other than a spicy, crispy, green bean dish) but I do recall the feeling of utter bliss that washed over us afterwards.  There’s something about the spiciness of Thai food which wiggles its way into that happy place in the brain and nests there, rather than sitting on your tongue in a searing cayenne hangover.

As a result, by the time we were leaving the weather seemed not to matter.  Glassy-eyed, and with a perma-smile on our faces, we floated back along the icy streets towards home, not noticing the cold, the wind, or the fact that there were still at least four months of this kind of weather still to get through.

This dish is something of my own little talisman against the winter, and more so against the umpteen depressive disorders winter can inspire.


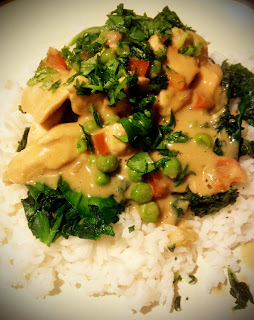
Swimming Rama

Sauce

  • 1/3 cup peanut butter
  • 4-5 Tbsp rice vinegar
  • 1 Tbsp sesame oil
  • 3-4 Tbsp soy sauce (preferably Tamari)
  • 1-2 stalks lemongrass, peeled and chopped fine.  Only use soft white part
  • 1 Tbsp grated fresh ginger (or about 1 tsp ginger powder)
  • 3-4 garlic cloves, minced or grated
  • ½ tsp chili paste
  • 2 Tbsp brown sugar or 3 Tbsp honey
  • 1 400 ml can coconut milk
  • 2-3 Tbsp lime juice (preferably kaffir/magrut lime)

  • ½ cup peas (frozen is fine.  Defrost in cool water, and drain)
  • 6-8 cups chopped spinach
  • 2 chicken breasts, cut into chunks or strips
  • 2-3 Tbsp oil (vegetable or peanut)


Garnish

  • 1 small tomato, seeded and chopped
  • ¼ cup chopped cilantro (or Thai basil)
  • Cooked Rice to serve

Combine peanut butter, vinegar, sesame oil, soy, spices and sugar in a small saucepan, and stir gently over med-low heat until mixture is evenly blended.  Add coconut milk and stir.

Heat a wok or skillet over med-high heat.  Drizzle in oil, and add chicken.  Fry until no pink remains showing on the outside, stirring and flipping as required.

When chicken is almost done (don’t worry too much if it’s still pink inside), bring the coconut milk mix to a boil.  When bubbling, add the chicken (draining fat, if necessary), reduce the heat to a simmer, and cook gently for 8-10 minutes.

Place the wok back on the heat.  Put about half a cup of water in, and add the spinach.  Stir spinach until evenly wilted.

Taste sauce, and add lime juice to taste, and peas.

Arrange rice on individual plates, or a large platter, with a well in the center.  Place spinach on the rice, then pour the chicken and sauce over spinach. 

Sprinkle with tomato and cilantro, and serve immediately.

Friday, February 10, 2012

A song in my heart, and soup on the stove


Happy February, y’all!

Over on the Facebook page there was a bit of banter going on about music.  I was making this particular soup, while listening to a Cure album, and it was just one of those moments where you are so immersed in what you’re doing, and the sounds around you, that there was that sense of time being suspended.  I sang along loudly (and poorly), shook my thang (again, poorly), and chopped, stirred, sautéed and boiled my way through a cooking experience without even noticing that I’d forgotten to feed the cats.  Finally when the album was done, and decibel levels returned to normal I was able to take notice of the allegedly starved felines yelling at me.  Ah well.

Music is food for the soul.  Food is… soul… for the… music…?  Damn, thought I had something there.

Serendipitously, I wanted to pay a proper homage to a project a dear friend, Natalie Burdeny, has been at the helm of.  The Vancouver Concert Opera Society (VanCOCO), although new on the scene, promises to be bringing a (dare I say it) plethora (I said it) of operatic innovation to Vancouverites in a highly accessible way.

With past productions of Bizet’s “Carmen”, and an award winning run of “Trouble in Tahiti” in the 2011 Fringe Festival, the launch into 2012’s season with Verdi’s “Rigoletto” is sure to be another foothold up the ladder of the local music scene.  Dizzying heights to follow…

So, how does one pay said homage?

Ladies and Gentlemen, I give you:

Rigoletto Ribollita!


A few more words before I dive into this soup recipe.  As mentioned above, music should be food for the soul, and this particular recipe is fully reflective of several facets which are applicable to VanCOCO’s journey.

For starters, the term ribollita means “reboiled”, and is used to refer to the peasant soup this originated from.  Often the peasants would collect the leftover food from wealthy landowners, and add their own ingredients, flare, re-cook it up and serve it as a whole new creation, accessible to the common people.  You don’t need me to go into point form notes to show how this applies to VanCOCO, do you?  I thought not.

Also, there’s one particular ingredient which I can already sense people’s resistance to.  Bread.  Yeah, yeah.  “In soup?!  Soggy bread?!” I assure you, it’s used as a thickener, and once cooked down it lends a surprising soft, luscious, velvety texture which definitely makes this stand out from being just another vegetable stew.  

In like fashion, people will say “Opera?!  Me?!”  Again, trust me.  VanCOCO’s smart productions drop the pretense one might associate with conventional operatic productions.  Whether you’re an aficionado of the sonic nuances of coloratura, or your musical knowledge only goes as far as “Damn, that girl can SING!”, there is a place for you.  And that place is in the audience.  At Rigoletto.  Go!

And lastly, and it hardly bears pointing out, but I’m going to do so anyways:  Rigoletto Ribollita?!  How fun is THAT to say?


1 c bacon or pancetta, diced
1 c fennel, diced
1 c carrot, diced
1 c celery, diced
3-5 cloves garlic, chopped fine
4-5 cups kale, chopped
½-1 cup basil leaves, chopped
2 bay leaves
1 796ml (28oz) can plum tomatoes, drained (reserve liquid), and chopped
1 398ml (14oz) can cannellini beans
3-4 cups chicken or veggie stock
2 cups bread cubes.  Sourdough, or a hearty artisan loaf recommended.  Cut the crusts off, cube it up, et voila!
Salt & pepper
Parmesan cheese, grated
Extra virgin olive oil

Saute bacon a few minutes over med-high heat, then add onion, reducing heat slightly.  Stir occasionally to cook bacon evenly, even allowing a bit of crispness to develop.

Add celery, carrots, fennel and garlic.  Season with salt & pepper, and cook about 7 minutes until veggies lose their sharp crispness.

Next, add the tomatoes, kale, bay leaves, and reserved tomato liquid.  Adjust heat to a strong simmer.  Allow to cook 7-10 minutes until kale has collapsed substantially.


Pour in the stock and add the cannellini beans (including liquid).

Reduce heat, and allow to simmer for 20-25 minutes.

Remove bay leaves (if you can find them.  If not, just issue a warning to anyone who’ll be dining with you), add bread cubes and cook over low heat for at least 10 minutes, stirring occasionally (gently).

Adjust salt & pepper, ladle into bowls, and serve garnished with fresh grated parmesan cheese, and a drizzle of extra virgin olive oil.

This is one of those classic Italian items which is twice as good the second day.

So there you have it!  Food for the belly, and food for the soul.  Check out the VanCOCO page, and share the love around!


Sunday, January 29, 2012

Burgers, Buns, (writers) Block, and a crush on Jamie Oliver


You know those moments when something has been staring you in the face the whole time and you failed to see it?  I’m not sure if I love those moments, or hate them with every fiber of my being.  On the one hand there’s the “eureka!” moment.  On the other hand, there’s a much more sustained “Yeah, DUH!” moment.

The reason I mention these moments of stupidity is that I’ve been agonizing over what to write about next.  So I’ve been sitting here, scrolling through a backlog of photos of random concoctions, half-written posts, and beating my head against the tabletop trying to think what is most suitable, while I wait for my burgers to finish roasting. 

You see where this is going, yeah?

BURGERS!

As per usual I have a backstory.  I love Jamie Oliver.  Is it the accent?  In part.  Is it his enthusiasm?  In part.  Is it the tousled, devil-may-care semi-spiky-floppiness of his hair?  A little bit of that too, yeah. 

It’s so many things.

It’s the way he gets down and dirty with the food he cooks.  Hands smashing ingredients freshly ripped from the soil together, punctuated by random exclamations (“Howzat!” being a personal favourite), and a genuine love for his creations.  He is a completely obsessive purist, and where Nigella Lawson is a food eroticist, Jamie takes his food out for a few dates, behaves like a gentleman, falls completely in love by the second date, and calls it back the next day to see how it feels.

This particular recipe rapidly became high in rotation for several reason.  First and foremost: it’s really good!  Second: it’s very time-liberating.  Smoosh stuff together, chuck em in the oven, and 25 minutes later they’re done.  No running back and forth between the barbeque, or peeking in on a frying pan, cutting through layers of carbon to discover a raw mess inside.  Nope, none of that.  They come out amazing every time!  That 25 minutes leave you free to tidy up, bathe a cat, do your nails, watch a PVRed half hour program (minus commercials, of course), or write a belated blog post.  *ahem*

As is my usual practice, I’ve tweaked the original recipe somewhat.  Feel free to do the same.  Particularly with the spices and seasonings.  I often find I only need one egg, whereas the original recipe calls for two.  Use your judgment.  If the beef mixture just isn’t holding together, add a second egg.  If it looks like it’s floating in a sea of egg, add more breadcrumbs.

Oven-roasted Hamburgers

·      2 ¼ lbs ground beef
·      ½ large red onion, chopped fine
·      1-2 cloves garlic, minced (optional)
·      1-2 large eggs
·      1-2 handfuls breadcrumbs (or Panko, if you buy the Costco-sized bucket loads like I do)
·      generous pinch cumin seeds
·      generous pinch coriander seeds
·      heaped spoonful Dijon mustard
·      few drops Worcestershire
·      salt and pepper (I HIGHLY recommend trying different peppercorns: Pink, Szechuan, Tellicherry.  Each one can completely change the scope of flavour.  Feel free to use regular pepper, too… Philistine)

Preheat oven to 450°

Grind dry spices in mortar and pestle.

Place remaining ingredients in a large bowl, sprinkle spices over, and mix well.  Adding breadcrumbs as required.


Mold into patties, more ball-shaped than pancake.  A flattened ball, if you will.

Place on roasting pan with drip tray for excess fat, and pop into the oven for 25 minutes.  If you want cheeseburgers, place slices or shredded cheese on patties at about the 20 minute mark.

As you can see from the photo at the top, I didn’t have buns on hand, so I used thick slices of homemade bread.  I just thought I’d make that clear in case you thought that I thought that that’s what buns were.

I also have this strange inability to be able to make burgers without this clip getting stuck in my head.